Read a Planting Bed from Back to Front
Plan a planting bed by mature height, spread, and shape to keep each plant visible from the paths and windows where you actually look.
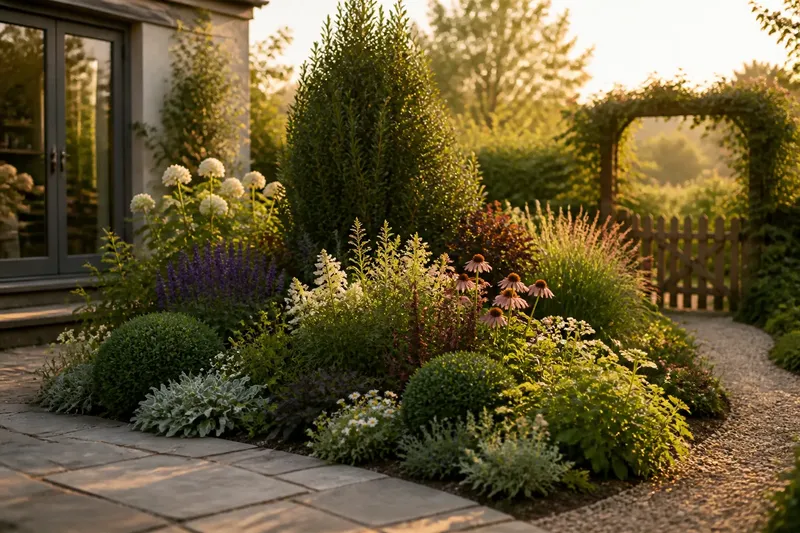
The most common planting-bed mistake is arranging plants by the size they are in their pots. A short nursery plant placed behind a tall one can disappear as both mature, costing you a clear view of a favorite plant and leaving an awkward gap in the composition. Planning a planting bed from back to front means judging mature height, spread, and shape, then checking the arrangement from the places you actually use.
Start with the views, not the bed’s edge
A bed is rarely seen from only one direction. You may look at it from a patio door, a path, the kitchen window, or the gate you pass on the way in. Each position changes what sits in front of what. A tall plant that works as a backdrop from the lawn can block a low mound when seen from the side.
Stand in those places before choosing positions. Note the eye-level view and the near edge of the bed. If a path curves past the planting, look from both ends of the curve; plants that seem neatly layered from one end may overlap from the other. A quick sketch with arrows for viewing directions is more useful than a polished drawing with no indication of where the viewer stands.
Say you are arranging a narrow bed beside a patio, with a taller shrub at the far end and low flowers along the front. If the main view is from the patio door, the shrub might sit behind the flowers. From a side gate, however, the shrub could line up directly in front of them. Shifting the shrub toward the bed’s end, then checking both views again, may keep the low flowers visible without making the planting look like rows.
Use mature height to set the visible layers
Height is the first useful sorting tool, but a label’s mature height is a starting point, not a promise about exactly where a plant will sit in your garden. Check the plant tag or a reliable nursery description for its expected mature dimensions and form. Sun exposure, soil, pruning, and local growing conditions can affect the result, so allow room to adjust as the planting develops.
Think in visual layers rather than a rigid short-to-tall staircase:
- Back layer: plants that provide a high outline or substantial backdrop, placed where they will not block important views.
- Middle layer: plants tall enough to connect the backdrop to the lower edge without hiding every neighboring shape.
- Front layer: low plants, edging plants, or open forms that remain visible from the path without concealing the soil line entirely.
Variation within each layer keeps the bed from reading as parallel ranks. A narrow upright plant can sit beside a rounded one of similar height; their outlines remain distinct even when their tops reach about the same level. In an island bed seen from all sides, height may rise toward the center, but a broad central plant can still screen smaller plants from a particular approach.
Spread decides whether neighbors remain visible
Height describes the top of a plant; spread describes how much of the view it can occupy. A compact plant can be tall enough to show above a neighbor yet broad enough to cover it at ground level. A low, spreading plant can obscure labels, edge stones, and the lower stems of taller plants. Both effects matter when deciding where a plant belongs.
Compare mature width as well as height, and mark approximate planting centers on the sketch. The distance between centers should account for the expected spread of both neighbors, not just the gap visible in the bare bed. A description that says a plant forms a clump suggests a different footprint from one that creeps outward or sends up separate upright stems. Those words hint at how the silhouette will develop.
In a tight bed, avoid solving every gap with another plant. An open pocket can preserve a view through the planting and give neighboring forms room to read as separate shapes. If one plant’s mature spread would cover most of a smaller neighbor from the usual viewing angle, move one of them or choose a narrower form. Crowding may look generous on planting day; it is less generous to the plant whose leaves vanish behind it.
Read shape as well as height and width
Two plants with similar dimensions can make very different views. An upright, column-like form leaves more of the planting visible beside it. A rounded mound blocks a wider area at eye level. Arching stems can create a window through the center, while a dense dome may close that same sightline. Flat, ground-hugging growth can define the front without adding much height.
Use shape to decide which plants should overlap and which should remain distinct. Repeating a rounded outline can make a bed feel coherent, but repeating it everywhere can flatten the view into one continuous mass. A few contrasting forms—an upright accent among mounds, or a fine-textured plant beside broad leaves—help the eye separate one plant from the next.
Texture contributes to that separation. Fine leaves may visually recede beside large, solid leaves, even when the plants are close in height. Pale or bright flowers can draw the eye forward, while a dark, dense plant may read as a visual wall. Treat color as a secondary cue, not a substitute for checking outlines and mature footprints.
Which arrangement keeps plants visible from every side?
Where should taller plants go in an island bed?
Place taller forms near the center or in an off-center group, then arrange shorter plants around them according to the views from each path. Walk around the bed and look for a tall or broad plant that hides a lower feature from one side.
How much space should I leave between plants?
Use the mature spread listed for each plant to estimate the distance between planting centers, and compare both neighbors rather than measuring from one plant alone. Leave more open space where a plant’s shape would otherwise cover a smaller form or close a useful view.
What if a plant’s mature size is unclear?
Look for a plant tag or nursery description that gives both height and width and describes growth habit. If the information remains uncertain, choose a less obstructive position that is easier to revise rather than placing it where a larger-than-expected plant would screen a valued part of the bed.
Can I change the arrangement after planting?
A planting plan can be revised as plants grow and the views become clearer. Before moving an established plant, check its care requirements and the appropriate season for transplanting; a garden center or qualified local horticulture professional can advise if the plant is sensitive or difficult to move.
Check the layout before you plant
Set nursery containers in their proposed places while they are still easy to shift. The containers do not need to match mature size exactly; use them to check order, overlap, and open space. For plants already in the ground, sticks or garden twine can mark a rough mature outline on the bed surface. Keep the marks approximate, since actual growth depends on conditions.
Say you have a narrow bed with a tall shrub, a rounded perennial, and low flowers, and the nursery tags show the shrub will spread broadly. You place the containers as planned, then stand at the patio door and the side gate. From the gate, the shrub hides most of the perennial; moving it toward the bed’s end reveals the perennial from both views, so that position is the clearer choice. The tradeoff is a less symmetrical arrangement, which is usually preferable to a plant disappearing behind its neighbor.
- Check whether the tallest plant blocks a smaller plant from the main path; if it does, move the taller plant toward the bed’s end or choose a lower form.
- Check whether a broad plant overlaps a neighboring mature outline; if it does, increase the gap or replace one plant with a narrower form.
- Check whether a low front plant hides the bed edge or labels; if it does, move it back or choose a less spreading plant.
- Check whether an upright plant leaves a useful sightline beside it; if it does not, shift it away from the view or use a more open form.
- Check whether the arrangement works from both ends of a curved path; if it does not, rotate or reposition the overlapping plants and check again.
- Check the view from a seated position near a patio; if a plant blocks a feature from that angle, lower or shift the plant, or accept the obstruction if that view matters less.
For a working sketch, write each plant’s name beside its expected height, spread, and shape—upright, mounding, arching, or spreading. Draw the likely mature outline lightly, and add arrows showing the views you checked. The sketch is not a scale plan; it is a way to catch an obvious conflict before digging.
Leave room for each plant to read clearly
A well-composed bed does not require every patch of soil to be hidden. Small openings let individual plants remain legible, preserve glimpses of the bed behind them, and make later changes easier. The goal is not a fixed picture from one favored spot but a sequence of recognizable shapes as you move past the planting.
When you are unsure between two positions, stand at the point where you most often see the bed and choose the arrangement that keeps important plants visible without forcing them into a line. Planning a planting bed by mature height, spread, and shape still allows for change as plants grow; checking the view early can keep one overlap from becoming the only view.